
Gluten-free sweet and sour sauce is simple to make when the sweet, sharp, and savory ingredients are measured with care. This version uses pineapple juice, gluten-free rice vinegar, red bell pepper, fresh ginger, and a small amount of ketchup for a bright red-orange sauce with a clean tang. Pineapple pieces add juicy bursts, while green onion and sesame seeds give the finished bowl a fresh restaurant-style look. It works as a dipping sauce for crispy shrimp, chicken, tofu, spring rolls, or roasted vegetables.
The recipe works because the sauce is built in stages. The sugar dissolves before the starch is added, the bell pepper cooks only until lightly tender, and the cornstarch slurry goes into a gently simmering liquid rather than a hard boil. That order prevents grainy sugar, raw starch flavor, and a sauce that turns rubbery as it cools. Using cold water in the slurry is especially important because warm water can make cornstarch clump before it reaches the pan.
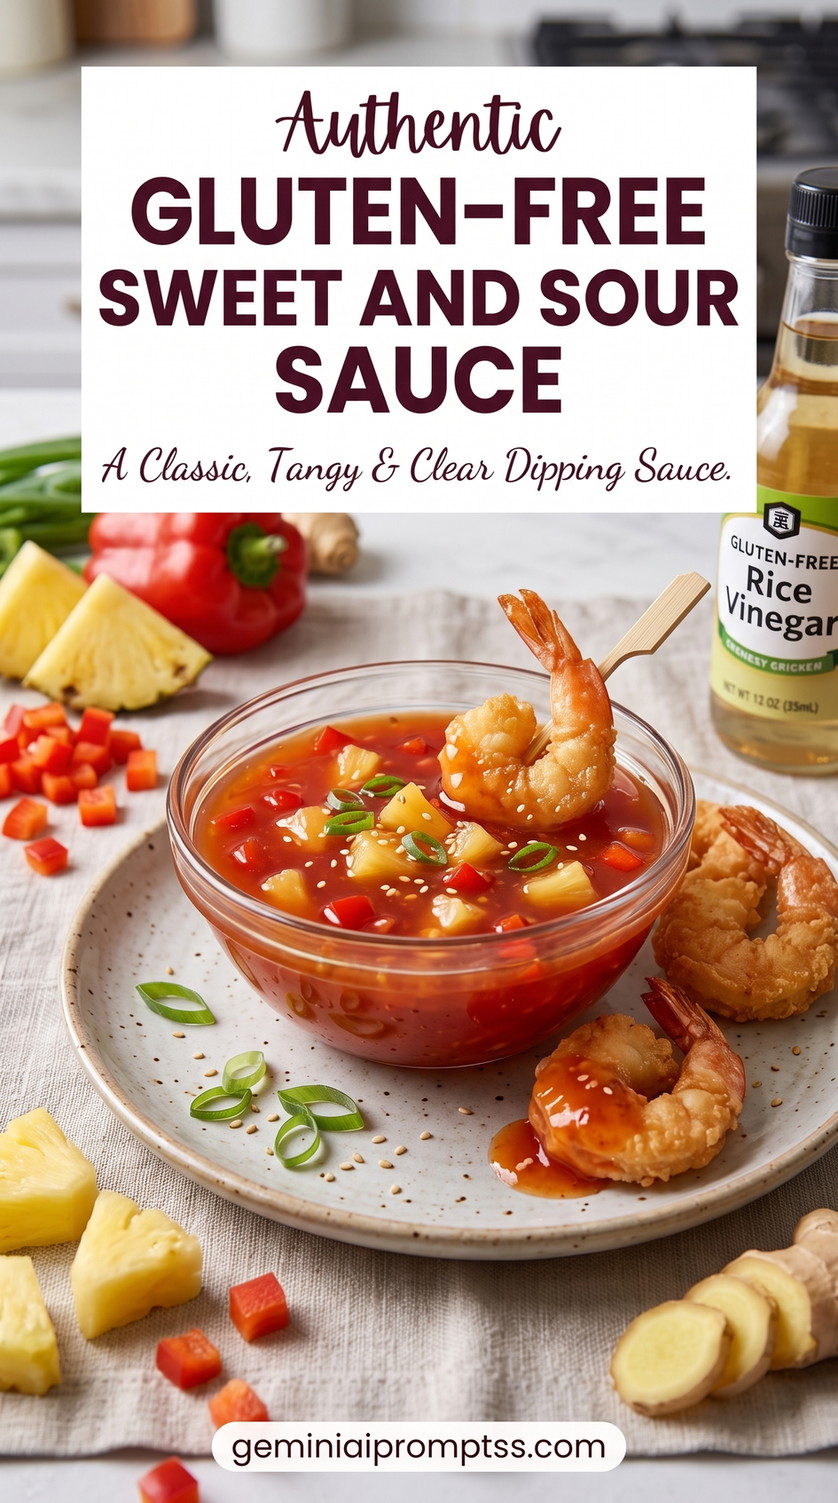
This batch makes about 2 cups, or sixteen 2-tablespoon servings. It is cooked on the stovetop in about 10 minutes after 15 minutes of preparation, then rested for 5 minutes so the texture can settle. Keep every packaged ingredient certified gluten-free when cooking for someone with celiac disease or a serious wheat allergy. Serve the sauce with fully cooked gluten-free breaded shrimp as pictured, and refrigerate leftovers promptly in a clean covered container.
Quick Recipe Summary
Recipe: Gluten-Free Sweet and Sour Sauce with Pineapple and Red Bell Pepper
Prep Time: 15 minutes
Cook Time: 10 minutes
Total Time: 30 minutes, including a 5-minute rest
Yield: About 2 cups, or 16 servings of 2 tablespoons each
Cuisine: Chinese-American
Main Method: Stovetop simmering and cornstarch thickening
What This Recipe Is Designed to Deliver
This gluten-free sweet and sour sauce is designed to be glossy, spoonable, and light enough to coat food without becoming a heavy gel. The first taste should be fruity and gently sweet, followed by the clean acidity of rice vinegar and a mild savory note from tamari. Fresh ginger adds warmth without making the sauce spicy. Small cubes of red bell pepper and pineapple remain visible in the finished sauce, giving each spoonful texture and color instead of leaving the bowl completely smooth.
The sauce is also meant to stay useful after cooling. Cornstarch thickens more as it rests, so the pan is removed from the heat while the sauce still flows slowly from a spoon. After five minutes, it reaches a dipping consistency that clings to crispy shrimp, chicken bites, tofu, or vegetables. The formula avoids wheat-based soy sauce and ordinary malt vinegar. Every bottled condiment should still be checked because gluten can appear in soy sauce, flavor blends, and processed dipping products.
Before You Start
Read every label before measuring. Use rice vinegar that is marked gluten-free, gluten-free ketchup, and certified gluten-free tamari. Plain cornstarch is naturally gluten-free, but a certified product is a safer choice when cross-contact is a concern. Also check the breading on any shrimp served with the sauce. A sauce can be correctly prepared and still become unsafe for a gluten-free guest if a wheat-breaded item is dipped directly into the shared bowl.
Cut the red bell pepper into small 1/4-inch pieces so it softens during the short simmer. Drain the pineapple pieces but save enough juice for the measured cup. Grate the ginger finely because large fibers can feel stringy in a smooth dipping sauce. Mix the cornstarch slurry only shortly before it is needed, and stir it again immediately before pouring because starch settles quickly at the bottom of the cup.
Choose a light-colored saucepan when possible. It makes the sauce color and simmer easier to judge. A dark nonstick pan also works, but watch the bubbles rather than relying only on color. Set the prepared shrimp, green onion, and sesame seeds aside until the sauce is finished. Adding the garnish too early dulls the green onion and softens the sesame seeds.
Ingredients, Purposes, and Practical Substitutions
The measurements below produce a balanced sauce rather than an extremely sugary restaurant glaze. Pineapple supplies fruitiness, rice vinegar provides the main sour element, and brown sugar rounds the sharp edges. Red bell pepper, ginger, green onion, and sesame seeds match the fresh ingredients shown with the finished sauce. Crispy gluten-free shrimp are included as the pictured serving option, but the sauce itself remains meatless.
Exact Ingredient List
- 1 cup (240 ml) unsweetened pineapple juice
- 1/2 cup (85 g) pineapple chunks, cut into 1/2-inch pieces
- 1/3 cup (67 g) packed light brown sugar
- 1/3 cup (80 ml) certified gluten-free rice vinegar
- 3 tablespoons (48 g) certified gluten-free ketchup
- 1 tablespoon (15 ml) certified gluten-free tamari
- 1/2 cup (120 ml) water, divided
- 1/2 cup (75 g) red bell pepper, cut into 1/4-inch cubes
- 1 tablespoon (6 g) finely grated fresh ginger
- 1 small garlic clove (3 g), finely grated
- 2 tablespoons (16 g) cornstarch
- 1/4 teaspoon (1.5 g) fine salt
- 1/8 teaspoon (0.25 g) ground white pepper or black pepper
- 2 tablespoons (12 g) thinly sliced green onion
- 1 teaspoon (3 g) sesame seeds
- 12 fully cooked gluten-free breaded shrimp, heated according to package directions, for serving as pictured
Why Each Ingredient Is Included
Pineapple juice: Pineapple juice provides the fruit base and gives the sauce a natural golden-red glow. Its sweetness is softer than straight sugar, while its acidity supports the rice vinegar. Unsweetened juice gives better control than syrup from a very sweet canned fruit pack. Orange juice can replace up to 1/4 cup, but the flavor becomes more citrus-forward and less like classic pineapple sweet and sour sauce.
Pineapple chunks: Small pineapple pieces create juicy texture and match the fruit visible in the finished bowl. Cutting them to about 1/2 inch keeps them easy to scoop with shrimp or chicken. Very large chunks make the sauce difficult to use as a dip. Crushed pineapple may be substituted, but drain it well and reduce the amount to 1/3 cup because it releases more liquid and creates a pulpier texture.
Light brown sugar: Brown sugar supplies controlled sweetness and a mild caramel note. It also helps the sauce look glossy once the starch thickens. Granulated sugar can be used in the same weight, producing a cleaner and slightly brighter flavor. Coconut sugar is not ideal here because it darkens the sauce and can cover the fresh pineapple taste.
Gluten-free rice vinegar: Rice vinegar creates the clear, gentle sourness associated with this style of dipping sauce. It is less harsh than distilled white vinegar and lets the pineapple remain noticeable. Use a bottle specifically labelled gluten-free when cross-contact matters. Apple cider vinegar can replace half the amount, but a full replacement gives the sauce a stronger apple flavor and a darker appearance.
Gluten-free ketchup: Ketchup contributes tomato flavor, red color, salt, and a little body. Three tablespoons are enough to color the sauce without turning it into a thick tomato glaze. Check the label because flavorings and production practices differ between brands. Tomato paste is not a direct replacement; if necessary, use 1 tablespoon tomato paste plus 2 tablespoons water and add 1 extra teaspoon sugar.
Gluten-free tamari: Tamari adds savory depth and keeps the sweetness from tasting flat. Ordinary soy sauce often contains wheat, so it should not be used in a gluten-free recipe unless the specific bottle is certified safe. Coconut aminos can replace tamari in the same quantity, but it is sweeter and less salty. Reduce the brown sugar by 1 teaspoon and taste before adding the fine salt.
Water: Water controls concentration and gives the bell pepper enough time to soften before the sauce thickens. Part of it goes into the saucepan, while the rest keeps the cornstarch slurry smooth. Do not replace the slurry water with hot sauce liquid. Cornstarch needs a cool liquid for even dispersion, or it can form stubborn lumps.
Red bell pepper: Red bell pepper adds crisp-tender texture, fresh sweetness, and bright red pieces like those visible in the bowl. The small dice is important because the sauce cooks quickly. Yellow bell pepper can replace it without changing the cooking time, though the sauce will show less red contrast. Green bell pepper is sharper and may require an extra minute of simmering.
Fresh ginger: Ginger gives the sauce a warm, fragrant background and matches the fresh root shown beside the dish. Finely grating it releases flavor quickly during the short simmer. Ground ginger can be used in an emergency, but use only 1/4 teaspoon because dried ginger is more concentrated and lacks the fresh aroma.
Garlic: One small clove adds savory aroma without pushing the recipe toward a garlic sauce. Grating the garlic helps it blend into the liquid and prevents large raw pieces. Garlic powder may replace it at 1/8 teaspoon. Do not add a full teaspoon of garlic powder; that amount would overpower the pineapple and become bitter during simmering.
Cornstarch: Cornstarch gives the sauce its clear gloss and dipping consistency. Two level tablespoons thicken about 2 cups of sauce without producing a sliceable gel. Measure it carefully and whisk it with cold water. Arrowroot starch can replace it in the same amount, but add the slurry at the end and avoid prolonged boiling because arrowroot can thin again under high heat.
Salt and pepper: A small amount of salt sharpens the fruit and vinegar flavors. White pepper keeps the sauce visually smooth, while black pepper gives tiny dark specks and a slightly stronger bite. Taste after adding tamari because different brands vary in saltiness. The goal is a balanced dip, not a salty table sauce.
Green onion: Thin green onion slices add fresh onion flavor and a bright green finish. Most are stirred in after the heat is turned off so they remain lively rather than limp. Chives can replace them in the same measured amount, giving a gentler onion flavor. Avoid raw yellow onion as a garnish because it is too strong for this smooth, fruity sauce.
Sesame seeds: Sesame seeds create a light nutty finish and match the scattered seeds visible on the plated sauce and shrimp. Toasted seeds have a stronger flavor, while plain seeds look lighter and taste milder. They are added after cooking so they remain distinct. Omit them for a sesame allergy; the sauce will still thicken and taste balanced.
Gluten-free breaded shrimp: Crispy shrimp provide the serving presentation shown with the sauce. Use a product clearly labelled gluten-free and prepare it according to its package directions. Keep the shrimp outside the sauce until serving so the breading stays crisp. For a meatless plate, use gluten-free breaded cauliflower or firm tofu cubes instead and adjust cooking according to the chosen product.
How to Make Safe and Useful Substitutions
Change one major element at a time. The sauce depends on a three-way balance between sugar, vinegar, and fruit juice. Replacing all three at once makes it difficult to predict thickness and taste. When using a sweeter pineapple juice, reduce the brown sugar by 1 tablespoon. When using a sharper vinegar, begin with 1/4 cup, simmer the sauce, and add the final tablespoon only after tasting.
For a soy-free sauce, replace the tablespoon of tamari with 2 teaspoons coconut aminos and 1 teaspoon water. Coconut aminos are sweeter, so reduce the brown sugar from 1/3 cup to 1/4 cup plus 2 teaspoons. The finished sauce will be slightly less savory and may look a little lighter. Check every ketchup and breaded accompaniment label because soy or wheat can appear in processed foods even when the main sauce ingredients seem simple.
Arrowroot starch can replace cornstarch gram for gram, but the cooking method changes. Bring the sauce base to a simmer first, lower the heat, then whisk in the arrowroot slurry. Cook only 30 to 60 seconds after thickening. Long boiling can weaken arrowroot. Tapioca starch is less suitable because it creates a stretchier, more elastic sauce than the clear dipping texture intended here.
Fresh pineapple works well, but very ripe fruit can release extra sweetness and enzymes. Cut it into small pieces and use the same 1/2-cup measure. Frozen pineapple should be thawed, drained, and blotted before use. Do not add frozen fruit directly to the thickened sauce because the sudden temperature drop can stop the simmer and make the starch set unevenly.
Kitchen Tools and Why They Matter
- 2-quart light-colored saucepan: This size gives enough room for bubbling without spreading the sauce too thin. A wider skillet evaporates faster and may create an overly thick result.
- Small mixing bowl: Use it for the cornstarch slurry. A bowl is easier to whisk than a narrow cup and helps reveal any dry pockets.
- Wire whisk: A whisk blends ketchup into the liquid and disperses the slurry quickly. A silicone whisk protects nonstick pans.
- Silicone spatula or wooden spoon: Use it to scrape the bottom and corners after the sauce begins to thicken. Cornstarch can settle and scorch if those areas are ignored.
- Fine grater: A fine grater turns ginger and garlic into a paste that cooks evenly during the short simmer.
- Chef’s knife and cutting board: These are needed for the small bell pepper and pineapple dice. Uniform pieces cook and scoop more evenly.
- Liquid and dry measuring tools: Accurate vinegar, juice, sugar, and starch measurements are essential because small changes have a noticeable effect on this sauce.
- Heatproof serving bowl: The sauce may be served warm. A shallow clear bowl shows the pineapple and red pepper and makes dipping easier.
Detailed Step-by-Step Method
Measure everything before turning on the stove. Sweet and sour sauce changes quickly once the slurry is added, so there is little time to chop garnish or search for a whisk. Keep the pineapple, pepper, green onion, sesame seeds, and prepared shrimp separate until their stated stage.
-
Step 1: Prepare the fruit, vegetables, and aromatics.
Cut 1/2 cup (85 g) pineapple into 1/2-inch pieces. Dice 1/2 cup (75 g) red bell pepper into 1/4-inch cubes. Finely grate 1 tablespoon (6 g) ginger and 1 small garlic clove (3 g). Slice 2 tablespoons (12 g) green onion thinly, keeping 1 tablespoon for the sauce and 1 tablespoon for garnish. Small, even pieces are important because the sauce simmers for only a few minutes.
Before continuing, check that the pineapple is drained, the pepper pieces are similar in size, and the ginger does not contain long visible fibers.
-
Step 2: Whisk the sweet and sour base.
In a 2-quart saucepan, combine 1 cup (240 ml) pineapple juice, 1/3 cup (67 g) brown sugar, 1/3 cup (80 ml) gluten-free rice vinegar, 3 tablespoons (48 g) gluten-free ketchup, 1 tablespoon (15 ml) tamari, and 1/4 cup (60 ml) of the water. Whisk for about 30 seconds until the ketchup is fully dispersed and no dry mound of sugar remains on the bottom.
Before moving on, scrape the bottom with the whisk. The liquid should look evenly red-orange with no dark ketchup streaks or packed sugar lumps.
-
Step 3: Add the bell pepper, ginger, and garlic.
Stir the diced red bell pepper, grated ginger, and grated garlic into the saucepan. Set the pan over medium heat. Stir every 20 to 30 seconds as the mixture warms. It should begin steaming after 2 to 3 minutes and reach a gentle simmer after about 4 minutes. Avoid high heat because a violent boil reduces the liquid too quickly before the pepper softens.
Continue only when small bubbles rise across the center and the raw garlic smell has changed to a sweeter, cooked aroma.
-
Step 4: Simmer the sauce base briefly.
Lower the heat to medium-low and simmer for 2 minutes. Stir twice during this period. The bell pepper should soften slightly while keeping a small bite. The liquid will still look thin because the starch has not been added. Taste a cooled drop. It should taste stronger and sharper than the final sauce because cooling and thickening will soften the flavors.
Before thickening, confirm that the sugar is dissolved and no crystals are visible around the edge of the pan.
-
Step 5: Make and add the cornstarch slurry.
In the small bowl, whisk 2 tablespoons (16 g) cornstarch with the remaining 1/4 cup (60 ml) cold water for 20 seconds. Scrape the bottom to loosen settled starch. While whisking the simmering sauce continuously, pour the slurry in a thin stream. Keep whisking for 30 seconds so the starch spreads before it sets.
The sauce should begin changing from cloudy to glossy. Stop pouring only if you notice a lump, whisk it smooth, and then continue.
-
Step 6: Cook until glossy and lightly thickened.
Maintain a gentle simmer over medium-low heat for 60 to 90 seconds, stirring with a spatula along the bottom and corners. The sauce is ready when it coats the back of a spoon and a finger drawn through the coating leaves a clear line. Do not boil longer than 2 minutes after thickening. Excess cooking can make the sauce too firm once cool.
Before removing the pan from the heat, lift a spoonful and let it fall back. It should pour in a smooth ribbon rather than splash like water or drop in a thick clump.
-
Step 7: Add pineapple and finish the seasoning.
Remove the saucepan from the heat. Fold in the 1/2 cup pineapple chunks and 1 tablespoon of the sliced green onion. Stir in 1/4 teaspoon salt and 1/8 teaspoon white or black pepper. Let the fruit warm in the sauce for 2 minutes without returning the pan to a boil. Taste a cooled spoonful and adjust only with a small amount: up to 1 teaspoon sugar for more sweetness or 1 teaspoon rice vinegar for more sharpness.
Before serving, make sure the pineapple is evenly distributed and the sauce remains fluid enough for dipping.
-
Step 8: Rest, garnish, and serve with crispy shrimp.
Let the sauce rest for 5 minutes. Pour it into a heatproof bowl and sprinkle with 1 teaspoon (3 g) sesame seeds and the remaining 1 tablespoon green onion. Arrange 12 fully cooked gluten-free breaded shrimp around the bowl after heating them according to package directions. Keep most of the shrimp outside the sauce so the coating remains crisp, dipping each piece only as it is eaten.
The finished bowl should show glossy red-orange sauce, visible pineapple and bell pepper, fresh green onion, and sesame seeds, with the sauce clinging lightly to the shrimp.
How to Tell When It Is Done
Watch the bubbles: Before the slurry is added, the sauce should simmer with small steady bubbles rather than erupting. After thickening, bubbles become slower and leave a brief trail. A hard rolling boil is unnecessary and can over-reduce the sauce.
Use the spoon-coating test: Dip a metal spoon into the sauce and lift it. A thin glossy layer should remain on the back. Draw a finger through it after the spoon cools enough to touch. The line should stay open. If the coating runs together immediately, cook 20 to 30 seconds longer.
Check the vegetables: The red bell pepper should be lightly tender but still hold its shape. It should not be raw and crunchy, nor so soft that it disappears. Pineapple is added at the end, so it should remain juicy and distinct.
Judge the sauce after resting: Cornstarch continues to tighten for several minutes. The sauce is properly finished when it clings to shrimp or a spoon after the 5-minute rest but still pours easily from the serving bowl. If it becomes thicker than expected, whisk in 1 tablespoon warm water before serving.
Common Problems, Causes, and Fixes
The sauce has cornstarch lumps
Lumps form when cornstarch is mixed with warm liquid, allowed to sit without re-stirring, or poured into a hard boil without whisking. Remove the pan from the heat and whisk firmly. For stubborn lumps, press the warm sauce through a fine sieve, return it to low heat, and cook for 30 seconds. Next time, use cold water and pour the freshly stirred slurry in a thin stream.
The sauce is too thick after cooling
The sauce may have boiled too long after the slurry was added, or the cornstarch may have been packed into the spoon. Warm the sauce over low heat and whisk in water 1 tablespoon at a time until it pours in a slow ribbon. Avoid adding a large amount at once because the flavor will become diluted. Use level measuring spoons and stop cooking as soon as the sauce coats a spoon.
The sauce is too thin
First allow the sauce to simmer for the full 60 to 90 seconds after the slurry is added. Cornstarch needs heat to thicken. If it remains thin, mix 1 teaspoon cornstarch with 2 teaspoons cold water. Whisk half of this small slurry into the simmering sauce and wait 30 seconds before deciding whether the rest is needed. Adding dry cornstarch directly will create lumps.
The flavor is too sour
Rice vinegar strength and pineapple sweetness vary. Stir in 1 teaspoon brown sugar while the sauce is warm, let it dissolve, and taste a cooled sample. Repeat only once if necessary. Adding too much sugar at once can turn a bright dipping sauce into a candy-like glaze. In the next batch, begin with 1/4 cup vinegar and add the final tablespoon after tasting.
The sauce is too sweet
Add 1 teaspoon rice vinegar and 1 teaspoon water, stir, and taste after the sample cools. A small pinch of salt can also sharpen the flavors without adding more acid. Do not add tamari as the first fix because it can make the sauce salty and dark. Using unsweetened pineapple juice and accurately packed sugar prevents this problem.
The sauce looks dull instead of glossy
Insufficient heat after adding the slurry can leave a cloudy starch appearance. Return the sauce to a gentle simmer and stir for 30 to 60 seconds. If it has already boiled for several minutes, dullness may come from overcooking. In that case, thin it slightly with warm water and serve; prolonged boiling will not restore the shine.
The shrimp coating becomes soggy
Crispy shrimp soften when they sit in warm sauce. Serve them beside the bowl and dip one at a time. When making a plated appetizer, spoon only a small stripe of sauce over each shrimp immediately before serving. Re-crisp softened shrimp in an air fryer or oven according to the product directions rather than microwaving them in the sauce.
Important Technique Notes
Keep the slurry cold: Cornstarch granules disperse in cold water before they swell. Warm liquid starts swelling them too early, creating little gelled beads. Whisk the slurry just before use because the starch sinks quickly even after it initially looks smooth.
Control the simmer: Medium-low heat after adding the starch gives enough energy for thickening without rapidly evaporating the sauce. A rolling boil can make the texture overly thick and can cause the sugar at the pan edge to scorch.
Add fresh pieces at the right time: Red bell pepper goes in early enough to soften. Pineapple goes in after thickening so it remains juicy. Green onion and sesame seeds are finishing ingredients; adding them off the heat protects their color and fresh taste.
Taste a cooled sample: Hot sauce can make sweetness and acidity harder to judge. Put a teaspoon on a small plate, wait 30 seconds, and taste it. This simple step prevents unnecessary sugar or vinegar adjustments.
Protect against gluten cross-contact: Use a clean saucepan, whisk, cutting board, and serving bowl. Do not use a spoon that has touched wheat-breaded food. When serving both regular and gluten-free appetizers, place the gluten-free sauce and dippers on a separate tray with their own utensils.
Planning the Recipe from Start to Finish
Begin by checking labels and clearing a clean work area. Measure the juice, vinegar, ketchup, tamari, and sugar into separate containers. Chop the pineapple and pepper, grate the aromatics, and slice the green onion. This preparation takes about 15 minutes and allows the 10-minute stovetop stage to move without interruption.
The sauce can be made one or two days before a gathering. Cool it, refrigerate it in a covered container, and reheat gently on the stovetop. Prepare the crispy shrimp shortly before serving so the coating stays crunchy. Keep the green onion and sesame garnish separate until the sauce is warm and in its serving bowl.
One batch provides about 2 cups. For a dipping appetizer, plan 2 tablespoons per person, enough for about 16 servings. For coating chicken, tofu, or vegetables, plan 1/4 cup per serving, giving about 8 portions. To double the recipe, use a 3-quart saucepan and allow an extra 2 to 4 minutes for the larger amount to reach a simmer. The starch quantity can be doubled directly.
Serving Suggestions and Portion Planning
Serve the sauce warm in a shallow bowl with gluten-free crispy shrimp arranged around it. Sprinkle the surface with green onion and sesame seeds just before the tray reaches the table. Pineapple chunks and red bell pepper should remain visible, making the dip look fresh and clearly homemade. Give each guest a small plate so dipped food does not drip back into the shared bowl.
The sauce also pairs well with gluten-free chicken nuggets, baked tofu cubes, vegetable spring rolls made with rice paper, roasted cauliflower, pork meatballs, or plain steamed rice. For a full meal, use 1/4 cup sauce per serving and spoon it over freshly cooked protein and crisp vegetables. Add sauce at the end rather than simmering crispy food in it, which protects texture.
For a party, place the warm bowl on a heatproof board and surround it with separate groups of dippers. Keep raw vegetables away from cooked shrimp utensils. For an everyday meal, serve the sauce with rice, sautéed bell peppers, broccoli, and a protein of choice. A portion of 2 tablespoons works as a dip, while 1/4 cup is enough to glaze a meal-sized bowl.
Storage, Reheating, and Freezing
Refrigerator Storage
Cool the sauce for no longer than 2 hours at room temperature, then transfer it to a clean airtight container. Refrigerate for up to 5 days. Store the crispy shrimp in a separate container for up to the time stated on its package, generally no longer than 3 days after cooking. Keeping them separate prevents the breading from absorbing the sauce.
Reheating
Reheat the sauce in a small saucepan over low heat for 3 to 5 minutes, whisking often. Cornstarch-thickened sauce firms in the refrigerator, so add 1 tablespoon water at the beginning and another only if needed. Heat until steaming throughout. Reheat shrimp separately in an oven or air fryer according to package directions so the coating becomes crisp again.
Freezing
Freezing is possible but not ideal. Cornstarch sauces can release water and lose some gloss after thawing, while pineapple and bell pepper soften. To freeze, cool the sauce completely, leave out the green onion and sesame garnish, and seal it in a freezer-safe container with a little expansion space. Freeze for up to 2 months. Thaw overnight in the refrigerator, whisk over low heat, and add 1 to 2 teaspoons of fresh cornstarch slurry only if the reheated sauce remains thin.
When to Discard Leftovers
Discard sauce held at room temperature for more than 2 hours, or 1 hour in very hot conditions. Throw it away after 5 refrigerated days even when it appears normal. Also discard it if the container is swollen, mold is present, the surface is unusually foamy, or the texture has changed in a way reheating cannot correct. Do not taste questionable sauce to decide whether it is safe.
Recipe Variations
Spicy Pineapple Sweet and Sour Sauce
Add 1 tablespoon (15 ml) gluten-free chili-garlic sauce with the ketchup and reduce the brown sugar by 1 tablespoon (13 g). Keep the rice vinegar unchanged. The sauce becomes moderately spicy with a deeper red color and slightly less sweetness. Simmering and thickening times remain the same. Garnish with 1 extra tablespoon sliced green onion and omit the white pepper so the heat stays clean.
Orange-Ginger Sweet and Sour Sauce
Replace 1/2 cup (120 ml) of the pineapple juice with 1/2 cup fresh orange juice. Add 1 teaspoon (2 g) finely grated orange zest with the ginger. Reduce the brown sugar to 1/4 cup (50 g) because orange juice adds sweetness. The sauce will be brighter and more citrus-forward, with a slightly lighter pineapple flavor. Cook the same way, but taste before adding the final salt.
Soy-Free Sweet and Sour Sauce
Replace 1 tablespoon tamari with 2 teaspoons (10 ml) coconut aminos and 1 teaspoon (5 ml) water. Reduce the brown sugar by 2 teaspoons (8 g). Use 1/2 teaspoon salt only after tasting, adding it gradually. This variation is a little sweeter and less savory, but it remains glossy and suitable for dipping. Confirm that every other packaged ingredient is also soy-free.
Smooth Dipping Sauce Without Fruit Pieces
Omit the 1/2 cup pineapple chunks and red bell pepper. Increase pineapple juice by 1/4 cup (60 ml) and reduce the initial saucepan water from 1/4 cup to 2 tablespoons (30 ml). After simmering the ginger and garlic, strain the base before adding the slurry. The finished sauce is smooth, clear, and easy to serve in small dipping cups. It cooks about 1 minute faster because there are no vegetable pieces to soften.
Final Success Checklist
- Every packaged ingredient, including tamari, ketchup, rice vinegar, and breaded shrimp, was checked for a gluten-free label.
- The pineapple was drained and the red bell pepper was cut into small, even cubes.
- The cornstarch was mixed with cold water and stirred again immediately before pouring.
- The sauce base reached a gentle simmer before the slurry was added.
- The sauce was whisked continuously while the slurry entered the pan.
- Cooking stopped when the sauce coated a spoon but still poured in a smooth ribbon.
- Pineapple, green onion, and sesame seeds were added at the correct late stages.
- The sauce rested for 5 minutes before its final consistency was judged.
- Crispy shrimp were kept separate until serving so the coating stayed crisp.
- Leftovers were cooled promptly and stored in clean covered containers.
Making Gluten-Free Sweet and Sour Sauce with Confidence
A reliable gluten-free sweet and sour sauce depends on balance and timing, not complicated ingredients. Pineapple juice and brown sugar create the sweet side, gluten-free rice vinegar supplies a clean tang, and tamari adds enough savory depth to keep the flavor rounded. Red bell pepper, pineapple pieces, ginger, green onion, and sesame seeds make the sauce look and taste fresh, while a carefully mixed cornstarch slurry creates the clear glossy texture.
The most important controls are easy to remember: verify every label, cut the vegetables small, use cold water for the slurry, and stop cooking while the sauce still flows. After a short rest, it will cling neatly to gluten-free crispy shrimp without turning into a heavy gel. Even a beginner can make this gluten-free sweet and sour sauce successfully by watching the simmer, using the spoon-coating test, and adjusting sweetness or acidity only in small measured amounts.